


Great Gradient Text Effects Using Macromedia Flash
Thursday, March 29, 2007 | 10:44 AM

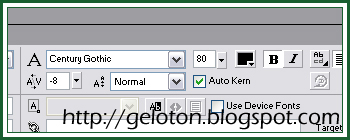
Step 1 After opening a new file in Flash, depending on how you are going to use the image, select a nice font type and size. To illustrate the steps well, I chose bold Century Gothic at font size 80. I also adjusted the Character Spacing to -8 to give the text a better look.
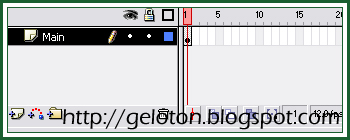
Step 2 Rename Layer 1 as Main, and then type your text.

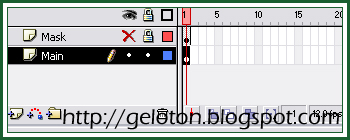
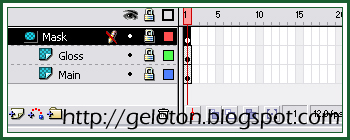
Step 3 Duplicate the layer. You can do this by first pressing CTRL+ALT+C (Edit > Copy Frames). Add a new layer, then select that new layer, and then press CTRL+ALT+V (Edit > Paste Frames). Rename this new layer as Mask. Make sure that the Mask layer is above the Main layer. Hide and Lock this layer for now.
Step 4 Select the text then hit CTRL+B (or select Modify > Break Apart) twice to ungroup the letters. This is to manipulate the text well, including each pixel group.

Step 5 Choose the Line Tool (N) then select the same color as your font. Drag a line from the first letter to the last. If there are dots, dashes, or other components, connect them to the letter group as well; you can use different segments for these.

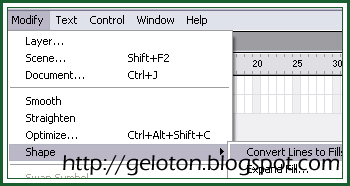
Click the Main layer again then select Modify > Shape > Convert Lines to Fills.
The purpose of this step is to group all of the pixel components as one. You can check that you have grouped all of them by deselecting the text, then clicking it again, and being able to highlight the whole thing without dragging
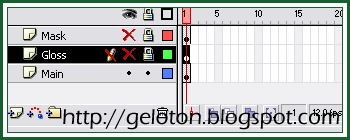
Step 6 Duplicate the Main layer again, following the steps in Step 3. This time, rename the layer as Gloss, and make sure that it is the middle layer. Lock and hide this layer as well.
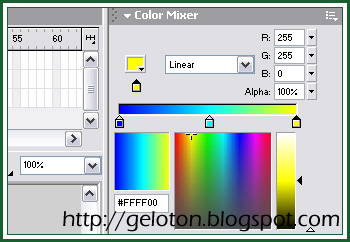
Step 7 Select the Main layer again and on your Color Mixer on the right, choose Linear as your gradient type. Select the colors that you want for your text. For this example, I chose #0000FF for the first color, #00FFFF as the second and for the third color, I selected #FFFF00.
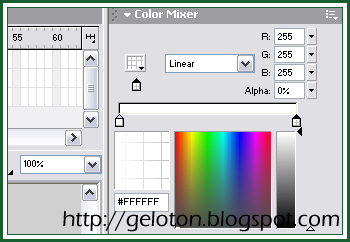
Step 8 Select the Gloss layer and unhide and unlock it. On the Color Mixer panel, select Linear again for your gradient type. For the first color, select white, and for the second color, select white as well but with an alpha of 0%.
Once you have applied this gradient on the text on the Gloss layer, select the Fill Transform Tool (F), and click and manipulate the gradient such that it becomes vertical for the text. Since this is for making the text shiny, you should resize the gradient to cover only down to the middle of the text.
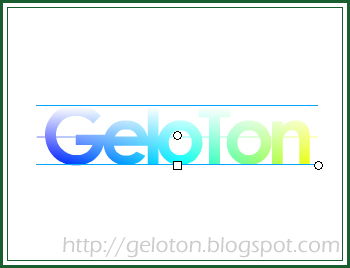
Step 9 We will now use the Mask layer to hide the horizontal line on the other two layers. Right-click the Mask layer then choose Mask. Make sure that the other two layers are included in the mask. You can do this by dragging the layers into the mask. Unhide then lock all layers.
You are done!
The purpose of this tutorial is to teach you the basics of how to effectively manipulate fonts. Following are some examples where I experimented with different gradient colors, shapes and angles, and different font types. I hope you learned something from this tutorial.


Labels: Graphics Design

Leave your response.